Sunday, June 17, 2007

How to add games to the Windows Vista Games Explorer

Note: There is an update to this post regarding a program that automates this process at the bottom of this page.

It is a very arduous process to get all of your old games to show up correctly in the Vista Games Explorer. I hope this guide saves at least one person from all of the trial and error that I had to go through.

These steps help prettify all of those games that aren't discovered automatically by Vista and also allows the games running on Steam to open nicely with the Games Explorer. After these steps, you will have a Games Explorer that looks something like this:
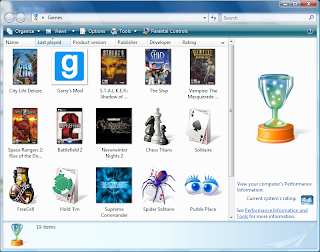

I found this forum entry to be extremely helpful. This might be all you need to know, but my steps are a bit more concise.

First find a game that Vista automatically finds and adds to the Games Explorer. I used the Steam shortcut that is created for most Half-Life 2 games named Half-Life: Source. It shouldn't matter what shortcut you use, as long as it gets regenerated if you delete it (not hide it, but rather delete the GUID folder). Also, the shortcut must be auto-generated by Vista and not added by the game itself. Games For Windows labeled games' shortcuts will not work.
  1. Find the box art for the game you wish to add to the Games Explorer and place the image on the desktop.
  2. Open the registry editor (Open the start menu and type regedit then hit enter)
  3. Navigate to HKEY_LOCAL_MACHINE_\Software\Microsoft\
    Windows\CurrentVersion\GAMEUX\
  4. You will see a few folders, one named Games and then a few others. Look through the other folders and you will find the games inside of the Games Explorer.
  5. Find the game that was auto-generated (Half-Life: Source in my case)
  6. Inside you should see various values describing the game. Look for the key named BoxArt and double click it.
  7. Point the BoxArt key to the picture you put on the desktop. This will cause the Games Explorer to copy the picture into its own cache and update the image in the Games Explorer Window.
  8. Now edit the other values to match the game you are adding. The important ones are Title (The name of the game) and AppExePath (Use the .exe file that the start menu shortcut for the game points to).
  9. The changes should be applied to the Games Explorer soon. After it updates, you can run the game who's shortcut you just edited (Half-Life: Source) again and its shortcut should once again appear in the Games Explorer. This new shortcut may be used to perform the above steps for another game.
In order to get Steam games to work well you can use these steps after you complete the above:
  1. Right click the game in Steam and select "Create desktop shortcut"
  2. Right click the new shortcut and select properties. Leave this window open.
  3. Go into Games Explorer and right click the new entry you created and select "Customize"
  4. In the screen that comes up, make sure the top entry (Play) is selected and click "Edit"
  5. This is a regular shortcut properties menu just like the other. Copy the "Target" and "Start in" entries from the desktop shortcut to the Games Explorer shortcut.
  6. That's it. The Games Explorer entry should run fine now, with or without Steam running when you click it.
Tips on editing the values to match the new game:
  • Microsoft pulls its information from AllGame.com, so doing a quick search of this site will get you the developer, publisher, and box art for your game and hopefully match their data in the future.
  • If AllGame does not have the data, you should try looking at the Wikipedia article relating to your game. There is always good information and box art available.
Update: There is now a program named VGE Editor that can complete these steps for you. It is currently in beta, but I have tried it out and it seems pretty stable.

Sunday, February 25, 2007

Windows Media Player kicks ass

I just transferred whats left of my music collection from my mobile phone to my PC. It's small but I spent a lot of effort hand picking good songs for my trip to Minnesota last spring break, so it represents my favorites.

The mp3s consist of the usual grab bag of random eMule files, LAN party shares, and anonymous CD rips, so of course the names are all totally wrong and none of the meta data are worthwhile. I am a clicker (I just click on a random song that sticks out at the moment) so I never really used meta data for anything. I have finally seen the light; semantic mp3s are amazing!

I started up WMP11 to play some music while configuring my system and while playing the song, WMP started downloading album art for the songs. I was like... whoa.

So I looked into it further and found that you can have WMP search your entire library for meta data and "fix" all of your mp3s for you automatically. Wow!

I went to Library-->More Options and looked at the options under Automatic media information updates for files.

I chose Overwrite all media information which corrects your meta data even if it was entered incorrectly already. Good for those weird Kazaa rips.

Then I selected rename music files using rip music settings so that all of my music was correctly labeled and named. No more NiN-WiTH_teeTH(08)-jacktheripper.mp3 woohoo!

And for good measure I went ahead and selected Rearrange music in rip music folder using rip music settings. Now my music directory under Windows is properly sorted and catagorized using industry standard titles and genres. Each band is given a folder and then inside that folder are albums holding mp3s for that album.

I know you can do this with other media players, but I haven't actually tried it and WMP just kind of floored me with its simplicity and organization. I am so happy now that I have a properly labeled and searchable music library. It even changed me from a clicker to listening by genre. Nice.

Installing Vista Ultimate Edition 64-bit

Well, I have had a fun 16 hours.

That is how long I have spent installing and configuring Vista and the applications I need. It's agonizing and I already miss the ease of Ubuntu.

The first problem occurred as I boot up Windows setup for the first time. When it reached the drive partitioner, it reported that it found no disks on my system. I kind of scratched my head for a minute before I remembered that I had trouble with my Promise RAID controller in Windows XP.

I previously had two 400GB drives connected in a RAID 0 array using my Promise chipset. One of them bit the dust so I was forced to switch the Promise controller into IDE mode. XP balked, but I got it working using a Promise SATA driver. On the other hand, Ubuntu refused to accept the RAID array, but the single SATA drive operated flawlessly. So I continued about my life.

Well Vista ending up choking the same way XP did without the driver. I did not want to deal with this BS again, so I shut off my computer and reconnected my drive to one of the VIA SATA ports. This solved the problem. Yay. I feel stupid for not doing this earlier.

So, with Vista now installed, I moved on to the exciting world of device drivers.

Since I chose to install the x64 version of Vista (as any true geek should), I expected at least one device to refuse to work. To my amazement, my Logitech QuickCam (the one that looks like HAL) was setup automatically by a tiny file received from Windows Update. Pretty slick in my opinion. My printer, video card, and USB hubs all worked out of the box. I didn't even have to deal with any unsigned driver issues.

I was feeling happy until I realized that I had absolutely no sound at all. Bleh. I have a Creative X-Fi Fatal1ty sound card and it wasn't even detected by Vista. It didn't even prompt me that it found an unrecognized device. Nothing.

So I went to Creative's website to download the driver. Low and behold it was listed as a beta version. <rant>WTF. I hate you Creative. Your shit doesn't work. Your drivers suck. Your cards don't even work in Linux!</rant> I downloaded it anyway and it installed smoothly.

Now that the hard part is over, I moved on to the easy stuff: applications.

I am tired of writing this blog entry for now. I will edit it later.

Friday, February 2, 2007

How to make a blog

Today I finally stopped procrastinating and started this blog.

My idea for this blog started from a notion that whenever I tried to inform someone of how to do something, I would end up finding holes in my factual knowledge that I would be eager to correct. If I told more people, then my knowledge of the subject would start to correctly align with the truth.

Also, I figured out that you can easily believe something is true without knowing all of the facts. It's easy to believe, but once you start asking others to believe, you end up needing many concrete facts.

Writing my thoughts down will force me to absorb the facts so that I can form an accurate and articulate thought. There is a very slim chance anyone will read this, but that slim chance does keep me on my toes where I feel I must not slip up or fudge the truth.

I hope this experiment works. If I continue after the novelty wears off and my classes get harder, then I will reap the fruits of my labor; better writing skills, more articulate thoughts, and proper understanding of subjects.

I felt like I learned something already with my first post. Here goes nothing!