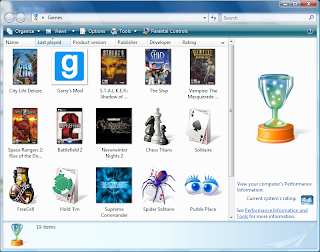
It is a very arduous process to get all of your old games to show up correctly in the Vista Games Explorer. I hope this guide saves at least one person from all of the trial and error that I had to go through.
These steps help prettify all of those games that aren't discovered automatically by Vista and also allows the games running on Steam to open nicely with the Games Explorer. After these steps, you will have a Games Explorer that looks something like this:

I found this forum entry to be extremely helpful. This might be all you need to know, but my steps are a bit more concise.
First find a game that Vista automatically finds and adds to the Games Explorer. I used the Steam shortcut that is created for most Half-Life 2 games named Half-Life: Source. It shouldn't matter what shortcut you use, as long as it gets regenerated if you delete it (not hide it, but rather delete the GUID folder). Also, the shortcut must be auto-generated by Vista and not added by the game itself. Games For Windows labeled games' shortcuts will not work.
- Find the box art for the game you wish to add to the Games Explorer and place the image on the desktop.
- Open the registry editor (Open the start menu and type regedit then hit enter)
- Navigate to HKEY_LOCAL_MACHINE_\Software\Microsoft\
Windows\CurrentVersion\GAMEUX\ - You will see a few folders, one named Games and then a few others. Look through the other folders and you will find the games inside of the Games Explorer.
- Find the game that was auto-generated (Half-Life: Source in my case)
- Inside you should see various values describing the game. Look for the key named BoxArt and double click it.
- Point the BoxArt key to the picture you put on the desktop. This will cause the Games Explorer to copy the picture into its own cache and update the image in the Games Explorer Window.
- Now edit the other values to match the game you are adding. The important ones are Title (The name of the game) and AppExePath (Use the .exe file that the start menu shortcut for the game points to).
- The changes should be applied to the Games Explorer soon. After it updates, you can run the game who's shortcut you just edited (Half-Life: Source) again and its shortcut should once again appear in the Games Explorer. This new shortcut may be used to perform the above steps for another game.
- Right click the game in Steam and select "Create desktop shortcut"
- Right click the new shortcut and select properties. Leave this window open.
- Go into Games Explorer and right click the new entry you created and select "Customize"
- In the screen that comes up, make sure the top entry (Play) is selected and click "Edit"
- This is a regular shortcut properties menu just like the other. Copy the "Target" and "Start in" entries from the desktop shortcut to the Games Explorer shortcut.
- That's it. The Games Explorer entry should run fine now, with or without Steam running when you click it.
- Microsoft pulls its information from AllGame.com, so doing a quick search of this site will get you the developer, publisher, and box art for your game and hopefully match their data in the future.
- If AllGame does not have the data, you should try looking at the Wikipedia article relating to your game. There is always good information and box art available.